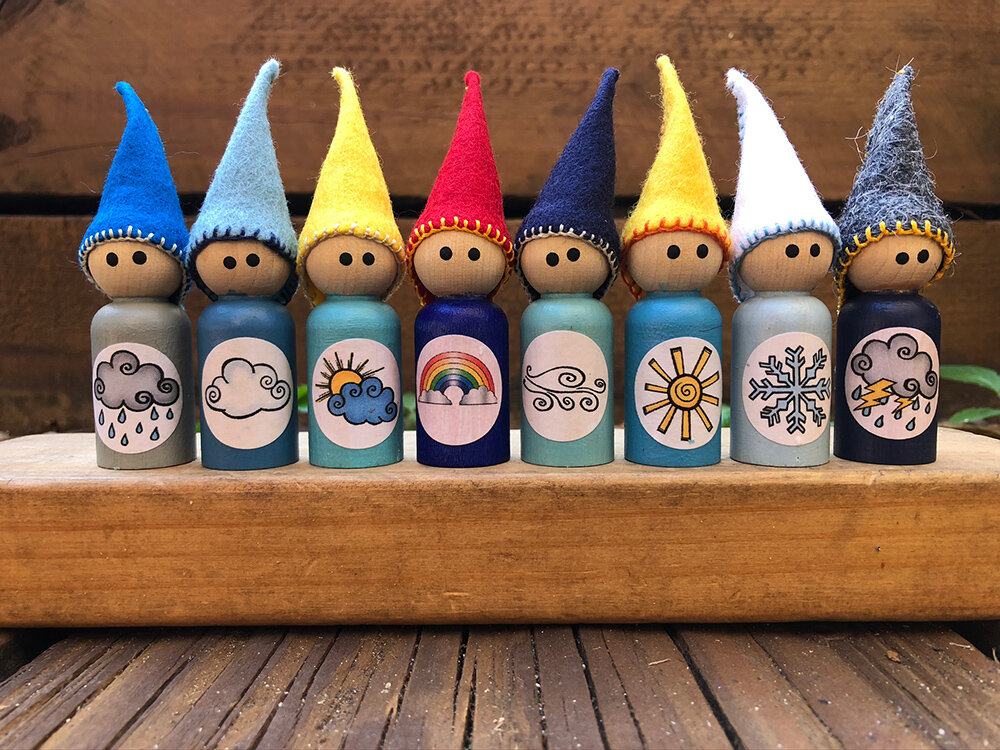
How to Make Weather Gnomes
Wooden peg dolls are a beautiful learning resource adapted from Waldorf education. These little dolls have traditionally been made into seasonal characters for nature table displays and play.
Traditionally, these dolls did not have facial features so that the children could decide on the emotions they wished the dolls to portray. This in turn encouraged emotional development and imaginative play experiences. My weather gnomes only have 2 dot eyes for this reason.
Crafting these gnomes is so much fun and they will be a great resource for children learning about the weather. Add them to your small world play spaces or the Science Weather table.
You can view this short video tutorial on how I make them or read the detailed post below.

Painting the Wooden Peg Dolls
You will need:
6cm (2&5/16in) wooden peg dolls
quality acrylic paint in the colours you wish to paint the dolls
a good quality half inch flat craft paint brush to apply the acrylic paint
jar of water
a rag or towel to protect your painting surface and to clean up spills
a palette. I use a damp sponge on a ceramic tile for my palette. I cover the sponge with greaseproof paper. This helps to stop the paint from drying out and makes clean-up easier. You can also use an ice-cream tin lid, a paper plate or a purchased palette.

It is quite important to invest in reasonably good quality supplies. Having quality paint and brushes will make the job so much easier.
Prepare your palette. Dampen the sponge, place it on the tile and cover the whole thing by wrapping it in greaseproof paper.
Ensure the wood doll is clean and dry. Sometimes you might need to give the doll a light sand with sandpaper, but I don’t find this is usually necessary.
Shake the paint bottle well and squirt a small amount of paint onto your palette. Mix the paint into just the tip of your brush bristles. It should only be about halfway up the bristles. The paint should be a smooth consistency. If it is thick or gluggy, you might need to mix in a little water.
Paint the doll, smoothing out any ridges in the paint as you go. Don’t apply the paint too thickly. It is much better to do a couple of thinner coats rather than one thick coat.
Paint the base of the doll if you wish.
Repeat this process for all the peg dolls. I like to use paint in different shades of blues and greys.

Making the Peg Doll Hat
You will need:
wool felt 9x6cm (3.5x2.5in) for each hat (I prefer wool felt but you can use acrylic)
a hat pattern (If you don’t have a pattern, you can download a printable that includes a hat pattern HERE)
sewing needle
embroidery floss
small scissors

Blanket Stitch
Pin the paper hat pattern to the felt.
Cut the felt around the edge of the paper pattern. Felt is great to work with as it doesn’t fray.
Split the 6 strands of the embroidery floss in half so that you have 2 lengths with 3 strands of thread in each. Thread 3 strands onto your needle and put a knot in end.
Fold the felt hat in half so that the sides marked A and B are together.
Using a blanket stitch, stitch sides A and B together.
Then blanket stitch around the brim of the hat.
Knot the thread and before cutting off the excess thread, hide it by passing it through some stitches inside the hat.
Adding the Weather Icons to Your Peg Dolls
You will need:
weather icons printed onto paper using non-bleeding ink. I have Boho themed icons to download and print HERE and Bright themed icons HERE.
either a 1 inch or 1 and a quarter inch circle paper punch (or small scissors)
Mod Podge (matte or gloss)
an old half inch flat paint brush to apply the Mod Podge
Cut out the icons. If you use a 1-inch punch, it will cut off the border of my printout. If you want to keep the border, use a 1 and a quarter inch punch. Of course, you don’t need the circle punch. You can use scissors to cut out the icons.
Decide which icon to put onto each painted doll.
Using the old half inch flat paint brush, apply a thin coat of the Mod Podge onto your painted doll. Mod Podge dries clear so apply it all over the general area you would like to have your weather icon.
While the Mod Podge is still wet, place the icon on top and gently smooth it down with your finger.
Still working while the Mod Podge is wet, apply another coat of Mod Podge over the top of the icon and all over the painted surface of the doll. Smooth over the icon with your finger. Then smooth out any ridges in the wet Mod Podge with your brush.
Set aside to dry.
Use these neutral Boho Weather Icons to make your own Weather Gnomes or Story Stones. Crafting these gnomes is so much fun and they will be a great resource for children learning about the weather or the Earth and Space curriculum.
Add them to small world play spaces or a Science Weather table. They also make wonderful loose parts to add to the blocks area. The Weather Gnomes or Story Stones can even be used at the writing area to extend vocabulary or used as a writing stimulus.
Instructions and a video tutorial link are included in the .pdf file.
The icons are also available in a BRIGHT theme HERE.
Use these Bright themed Weather Icons to make your own Weather Gnomes or Story Stones. Crafting these gnomes is so much fun and they will be a great resource for children learning about the weather or the Earth and Space curriculum.
Add them to small world play spaces or a Science Weather table. They also make wonderful loose parts to add to the blocks area. The Weather Gnomes or Story Stones can even be used at the writing area to extend vocabulary or used as a writing stimulus.
Instructions and a video tutorial link are included in the .pdf file.
The icons are also available in a BOHO theme HERE.


How to Secure the Felt Hat to Your Peg Doll
It is a good idea to glue on the hat before you paint the eyes on your weather gnome. The positioning of the hat can help decide on pleasing eye placements.
You will need:
strong craft glue or a hot glue gun
Run a line of glue around the entire inside rim of the hat.
Position on the head and press around the glued rim with your fingertips to ensure a good bond.
Allow to dry.

How to Paint the Eyes On a Peg Doll
You will need:
lead pencil
black acrylic paint
craft paint brush
You might like to first mark the eye position with a little lead pencil dot on the peg doll face. These eye dots can be erased and re-drawn until you have a pleasing position.
To paint the eyes, use the tip of the brush handle. Dip the top of the brush handle (not the bristle end) into the black paint and then dob it gently onto your marked lead pencil dot. A simple up-down motion is all you need.
Re-dip the handle into the paint before applying the second eye. This will ensure both eyes are the same size.

If you make some of these gnomes, I would really love to see them. Please tag me if you post them onto Facebook or Instagram.

Follow me on

Follow me on